Deploying an application can be hard. The new code must be pulled in, permissions must be set, migrations must be run, etc. In some cases the whole website goes down while deploying a new version. And the more that must be done manually, the more can, and eventually will, go wrong.
That's why Continuous Deployment exists. This is a process where the code is put into production automatically when some checks are passed. There are several tools that can handle this for you. Capistrano (Ruby) and Deployer (PHP) are examples. The downside of these tools is that you must run them from your local computer, which means you need server access from your local computer and access to the deploy script.
Meet Laravel Envoyer. This is a tool created by Taylor Otwell, the creator of Laravel. This tool allows you to run deployments via a browser interface. It can be triggered manually or by a push to Git. It requires only two things:
Your code must be on GitHub, Bitbucket, or GitLab.
SSH access to the server for deployment.
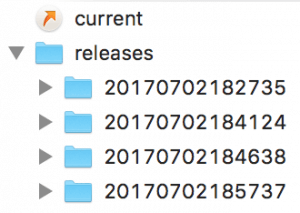
The process of deploying is pretty simple. It makes a shallow copy of your code (without version control) in a folder named with a timestamp, runs composer install, and symlinks to the new location. On the next deployment, a folder with a new timestamp is created and the process repeats. This way it is easy to roll back to a previous release, as it is still on the server. It just changes the symlink to an older version.
As you may suspect, this is optimized for Laravel. For example: by default, WordPress does not use Composer. But it is still possible to use Laravel Envoyer for WordPress deployments, as it also provides the option to use custom deployment hooks.
Setting up the deployments
The first thing we need to do is figure out what we are going to deploy and which dependencies are loaded externally. In Laravel applications this is usually handled using Composer. There is always a discussion about adding WordPress and its plugins to Git, as it's not your code. I like to add it, as you can control the exact versions of WordPress and all plugins you put online. But if you would like to download and install WordPress while deploying, that is completely doable with Envoyer and WP-CLI, but is not covered in this walkthrough. For now we are going to configure these steps:
Download the code, handled by Envoyer.
Symlink wp-config.php.
Symlink wp-content/uploads.
Activate the new release, handled by Envoyer.
Symlink wp-config.php
As it is unsafe to put files with passwords and other tokens in your version control, it is a good idea to place the wp-config.php file in the storage folder. The contents of this file exist only on the server and stay persistent between deployments.
Laravel Envoyer supports symlinking for directories, but not for single files. That's why we need to do this manually. Within Envoyer go to Deployment Hooks -> Clone new release -> After this action -> Add Hook and add this line:
ln -s {{project}}/storage/wp-config.php {{release}}/wp-config.php
Make sure that the file storage/wp-config.php exists.
Symlink wp-content/uploads
The uploads folder is a typical folder you don't want to put under version control and that should be persistent between deployments. Laravel Envoyer makes it easy to symlink complete folders. Just make sure the storage/wp-content/uploads folder exists. Within Envoyer go to Deployment Hooks -> Manage Linked Folders and click Add Linked Folder:
From: wp-content/uploads
To: storage/wp-content/uploads
Done
Now hit that Deploy button and see what happens.